User interface⚓︎
This article covers the most important aspects of the FleetControl interface. Use it as a reference for common interactions that work the same way across different pages.
Layout overview⚓︎
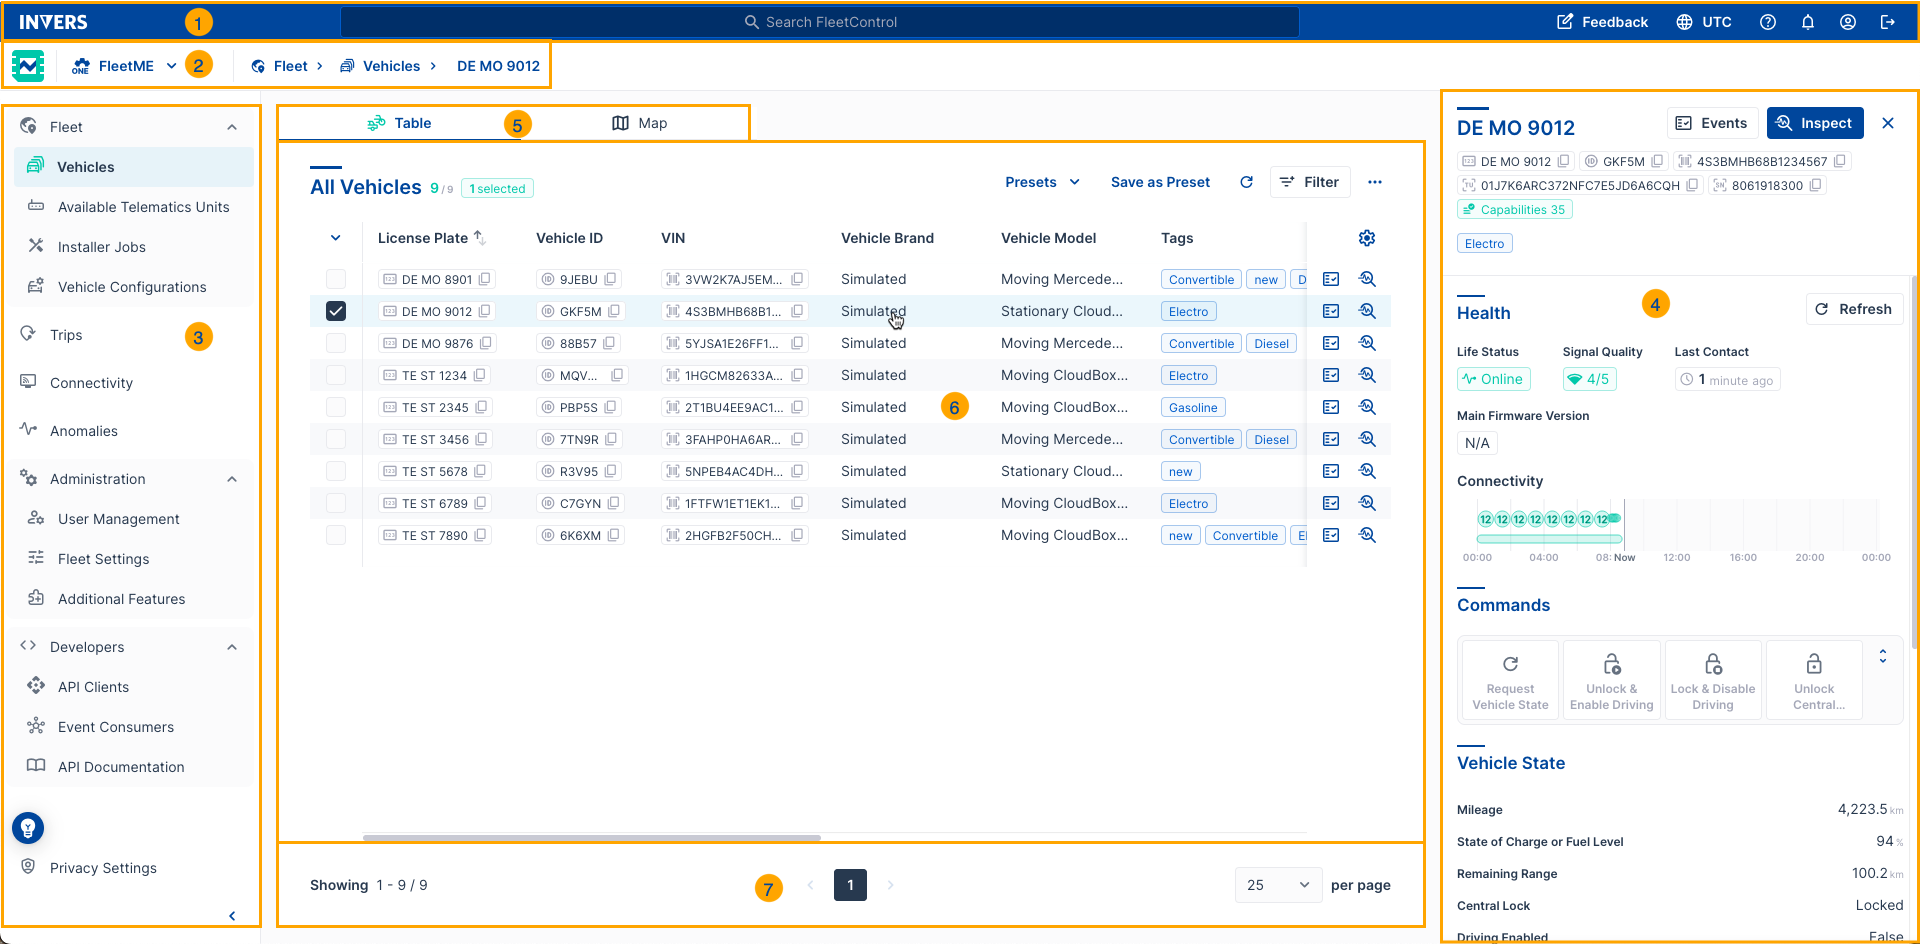
- Header: Access Global Search, feedback dialog, time zone settings, help, My Profile, and logout options.
- Breadcrumbs: Navigational aids that show your current location within FleetControl.
- Main Navigation: Organized menu grouping fleet management tools into logical sections:
- Fleet: Core vehicle management of Vehicles, Available Telematics Units, Installation & Maintenance, and Vehicle Models
- Monitoring: Oversight with Trips, Connectivity, Anomalies, and Smoke Alerts
- Bulk Operations: Fleet-wide actions like Firmware Updates, Vehicle Configurations, and Vehicle Transfers
- Administration: System management including User Management, Fleet Settings, and Additional Features
- Developers: Integration tools with API Clients, Event Consumers, and API Documentation
- Side Panel: Displays details, tools, or supplementary information when you select an item.
- Tab Bar: Switch between different views in the main content area.
- Main Content Area: Displays the core features and data for the selected section.
- Footer: Contains pagination and page navigation tools.
Visibility
Some elements might not be visible depending on the permissions assigned to your INVERS Login. Certain features are Additional Features that can be booked according to your operational needs.
Global search⚓︎
Use the search bar in the header to find vehicles and telematics units across FleetControl.
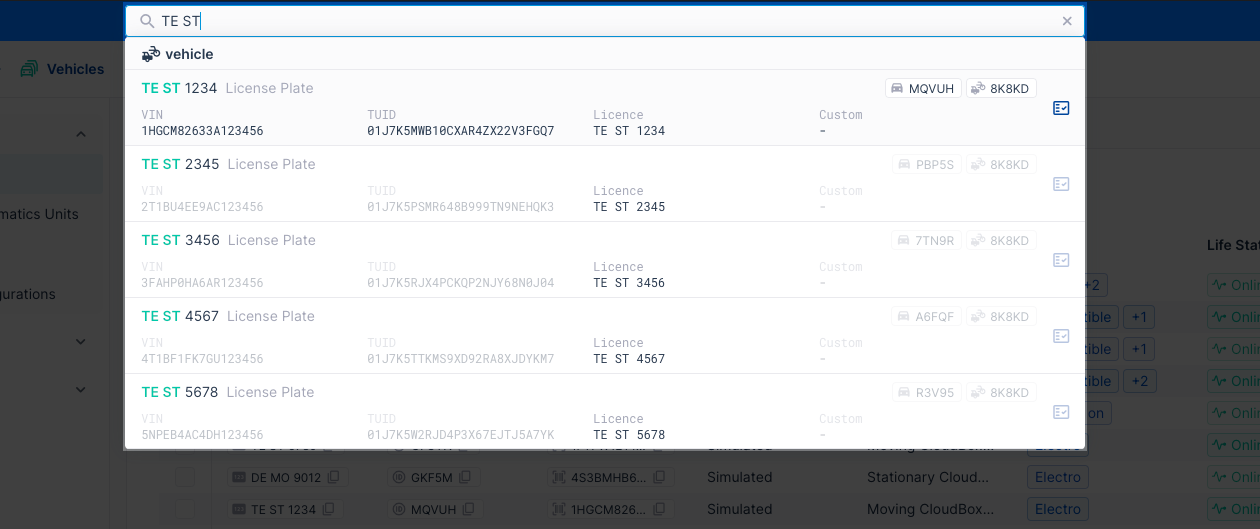
Searchable identifiers:
- Custom Name
- License Plate
- Vehicle ID
- VIN
- Telematics Unit ID (QNR)
- Serial Number
Type at least three characters to see results. Select a result to open the item directly.
Open Global Search from anywhere in FleetControl using Cmd+G (Mac) or Ctrl+G (Windows). Use the arrow keys to move through results and Enter to open the selected item.
For advanced vehicle search options including filtering, radius search, and column filters, see Finding Vehicles.
Working with tables⚓︎
Many FleetControl pages display data in tables. These tables share common features for customization and navigation.
Configuring columns⚓︎
Select Configure Table Columns (⚙️) to customize which columns appear and their order.
- Select Configure Table Columns (⚙️)
- Drag and drop columns in Selected Columns to reorder
- Remove columns by dragging them out or selecting the minus (−) icon
- Add columns from Available Columns by searching or selecting
- Select Apply to save changes
- Select Reset to Default to restore the original column layout
Your column configuration is saved and applies to future sessions.
Some tables have Fixed Columns that always appear and cannot be removed.
Sorting⚓︎
Select any column header to sort the table by that column. Select again to reverse the sort order. An arrow (↑/↓) indicates the current sort direction.
Sorting applies to the current result set and respects your active filters.
Pagination⚓︎
Use the footer controls to navigate through large datasets:
- Next / Previous: Move between pages
- Items per page: Select the number of rows to display (typically 25, 50, or 100)
The counter shows how many items match your current filters and how many are selected.
Filtering data⚓︎
Select Filter to narrow displayed results. The available filter options vary by page.
Filters use AND logic—results must match all active filter conditions. Active filters appear as tags above the table.
Select Reset to clear all active filters.
For detailed information on filter operators, data types, and building complex filters, see Filtering Vehicles.
Filter presets⚓︎
Save frequently used filter combinations as presets for quick access.
To create a preset:
- Configure your filters
- Select Save as Preset
- Enter a descriptive name
- Confirm
To apply a preset: Select it from the Presets dropdown
To update a preset: Apply the preset, adjust filters, then save with the same name
To delete a preset: Open Presets, then select the trash icon next to the preset
Presets are saved to your account and shared with colleagues who have access to your fleet. Name presets by purpose rather than by author (for example, “Low Battery Vehicles” instead of “John’s Filter”).
Side panels⚓︎
Many pages display a Side Panel when you select a row or item. The panel shows additional details and quick actions without leaving the current page.
- Select a row to open the panel
- Select elsewhere or use the close button to dismiss
- Available information and actions vary by page
Side panels provide a preview of detailed information. For complete details, open the dedicated page (such as Inspect for vehicles or Events for event history).
Action buttons⚓︎
Table rows include action buttons on the right side for quick access to common tasks.
| Element | Behavior |
|---|---|
| Icon buttons | Execute quick actions directly. Hover over an icon to see a tooltip describing its function. |
| More Actions (⋯) | Opens a menu with additional options for the selected item. |
Common icon actions include:
- Show Events: Open the events list for this item
- Inspect Vehicle: Open the vehicle detail view
- Configure: Access configuration options
The available actions depend on the page, the item type, and your permissions.
Bulk operations⚓︎
Some pages support actions on multiple items at once:
- Select items using the checkboxes on the left side of each row
- Use the header checkbox to select all visible rows
- Open More Actions (⋯) in the table header to see available bulk actions
Bulk actions are only enabled when you have selected at least one item and have the required permissions.
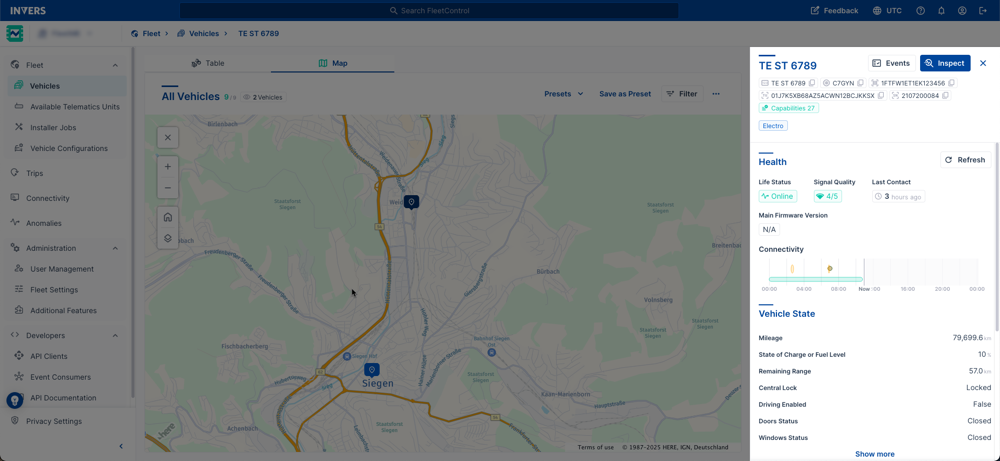
Map controls⚓︎
Pages with maps share common navigation controls:
| Control | Function |
|---|---|
| Zoom In / Out | Adjust map detail level. Use scroll wheel or buttons. |
| Map / Satellite | Switch between street map and satellite imagery. Satellite view helps identify underground parking or parking structures. |
| Show / Hide POIs | Toggle points of interest such as gas stations or charging points. Hide POIs to reduce visual clutter. |
| Home | Reset the view to fit all visible items within the current filter. |
Select a marker or cluster on the map to see details. Clusters break apart as you zoom in to reveal individual items.
Map and table sync⚓︎
On pages with both a table and map view (such as Vehicles), filters and selections sync between views. Apply a filter in the table, then switch to the map to see the same filtered set displayed geographically.
Exporting data⚓︎
Export filtered data for analysis, reporting, or sharing with external parties.
CSV export⚓︎
Most table pages support CSV export for use in spreadsheet applications:
- Apply filters to select the data you need
- Configure columns to include the fields you want to export
- Open More Actions (⋯) in the table header
- Select Export or Export to CSV
The export includes only data matching your current filters and visible columns.
PDF export⚓︎
Some pages (such as Smoke Alerts) offer PDF reports for individual items:
- Select the item or open its More Actions (⋯) menu
- Select the PDF export option
- The report downloads to your browser’s default download location
For multiple items, select them first, then use the bulk export option to download a ZIP file containing individual PDFs.
Flag system⚓︎
Some pages use a flag system to track workflow status for cases or alerts. This system appears on pages like Anomalies and Smoke Alerts.
| Status | Meaning |
|---|---|
| Unflagged | New item, not yet reviewed |
| Flagged | Marked for attention or follow-up |
| Checked | Reviewed and documented |
| Issue Detected | Confirmed issue requiring ongoing action |
To change flag status:
- Select the flag icon repeatedly to cycle through statuses
- Use the dropdown menu next to the flag to select a specific status
Use flags together with filter presets to organize team workflows. For example, create a preset for “Flagged Cases” to review items marked for attention.
Time zone settings⚓︎
FleetControl can display times in your local time zone or in UTC.
Select the time zone indicator in the header to switch between:
- Local: Times displayed in your browser’s local time zone
- UTC: Times displayed in Coordinated Universal Time
Your selection applies across all pages and is saved to your profile.
Working with international teams
Use UTC when coordinating with colleagues in different time zones or when sharing exports with external parties.
Keyboard shortcuts⚓︎
FleetControl supports common browser shortcuts:
| Shortcut | Action |
|---|---|
| Cmd+G / Ctrl+G | Open Global Search |
| Ctrl+F / Cmd+F | Open browser search to find text on the current page |
| Tab | Move focus between interactive elements |
| Enter | Activate the focused button or link |
| Esc | Close dialogs and panels |
Related articles⚓︎
- Finding Vehicles — Global Search, Column Filter, Filter dialog, Radius Search
- Filtering Vehicles — Filter operators, data types, best-practice filters, presets
- Inspect — Vehicle details, commands, and diagnostics
- Events — Event history, timeline, and export