Mobility Provider Guide
Use Installation & Maintenance to manage CloudBoxx installations and vehicle maintenance through service partners — external contractors or your internal installation team. Create jobs, assign them to a service partner, and grant technicians temporary access to only the vehicles they need. Access ends automatically when a job is complete.
Set Up Service Partners⚓︎
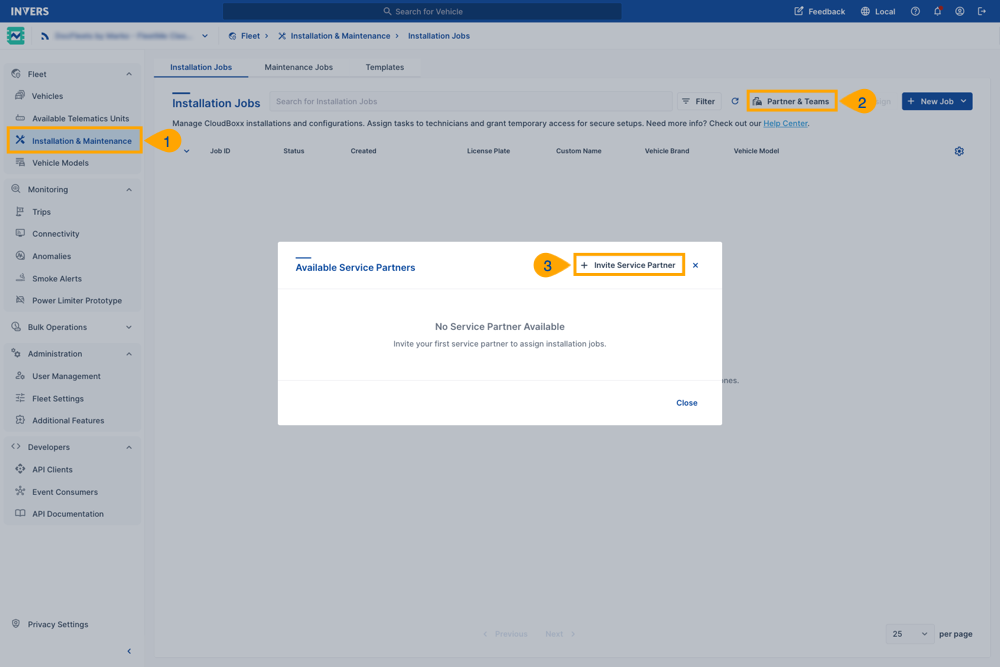
Invite a service partner or team to work with you and grant access to jobs in your fleet. A service partner can be an external contractor or a service team in your company, responsible for installation and maintenance of hardware tasks like setting up a CloudBoxx in new vehicles. If you manage multiple fleets, send separate invitations. Only one invitation per fleet, per service partner is needed.
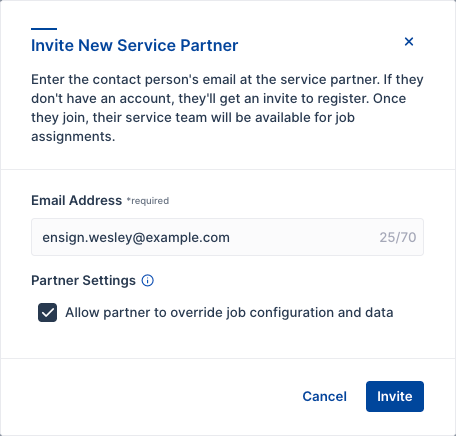
Invite a New Service Partner⚓︎
- Go to Fleet → Installation & Maintenance → Installation Jobs.
- Select Partner & Teams.
- Enter the partner’s email address.
- Optional: Under Partner Settings, enable Allow partner to override job configuration and data if your service partner has extensive experience and needs flexibility to adjust predefined installation settings during the installation process.
- Select Invite.
Available Service Partners⚓︎
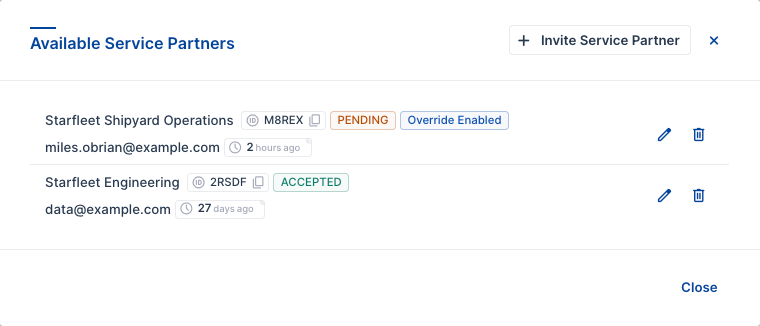
After sending an invitation, select Partner & Teams at any time to open the Available Service Partners dialog, which shows all your service partners and their current status.
-
Status Tag: Shows whether the partner has completed registration.
- PENDING: Invitation sent, waiting for partner to complete registration.
- ACCEPTED: Partner registered and ready to receive job assignments.
- DECLINED: The service partner declined your invitation. Remove the declined entry first, then send a new invitation to re-establish the connection.
-
Partner ID: Unique identifier displayed next to the partner name (e.g., “T1E2S”, “DEMO1”).
- Override Enabled Tag: Indicates whether this partner is allowed to modify job configurations.
Partner Settings⚓︎
When you enable Allow partner to override job configuration and data, your service partner can modify the configuration and data you’ve predefined in installation jobs. This setting is useful when working with highly experienced technicians who can make informed decisions based on their expertise.
If disabled, technicians must follow the exact configuration defined in each installation job.
Partner IDs for CSV Import⚓︎
The Partner ID is required when you want to automatically assign jobs during CSV import.
To copy a Partner ID:
- Select Partner & Teams in the Installation Jobs tab.
- Locate the partner in the Available Service Partners dialog.
- Copy the Partner ID displayed next to their name (e.g., “VEZ9A”).
- Use this ID in your CSV file under the column
assigned_installer_company_id.
When your CSV includes this Partner ID, imported jobs are automatically assigned to that service partner with ASSIGNED status, ready for technicians to start work immediately.
Use Templates⚓︎
Templates make recurring installation jobs faster and more consistent. Create templates to define standard settings that apply across multiple vehicles—perfect for fleet expansions with identical vehicle models or common configuration patterns.
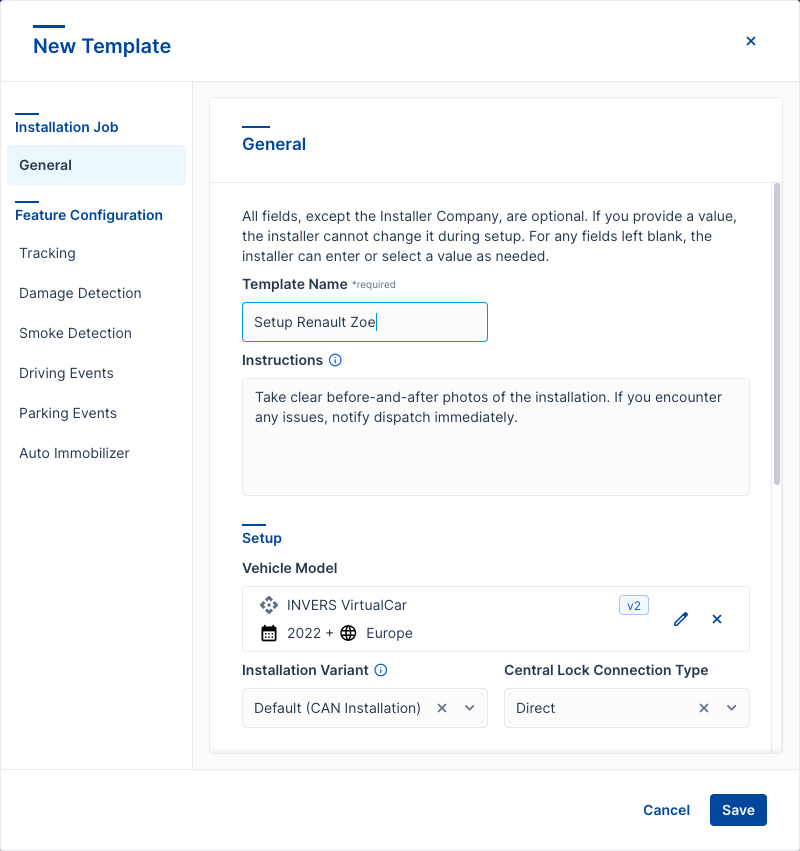
What Templates Include⚓︎
Templates let you predefine:
- Master data: Vehicle brand, model, fuel type, year of production, vehicle type, transmission
- Installation settings: Installation variant, central lock connection type
- Feature configurations: Auto Immo Control, Driving Events, Damage Detection, and more
By filling in these fields once, you avoid repetitive data entry and reduce configuration errors.
Create a Template⚓︎
- Go to Fleet → Installation & Maintenance.
- Select the Templates tab.
- Select New Template.
- Enter a Template Name.
- Fill in the job data as needed.
- Select Save.
Tip
You can also create a template while setting up a new installation job. Activate Save as Template before saving the job. After saving, you will be asked to enter a name for the template. Then, select Save as template to add it to your templates list.
When to Use Templates⚓︎
Templates can be edited or removed at any time. Changing a template does not affect jobs already created.
Templates work with all job creation methods:
- Single jobs: Apply a template and adjust vehicle-specific details.
- Create Multiple Jobs: Generate several identical job drafts from one template.
- CSV Import: Combine template settings with CSV data for complete automation.
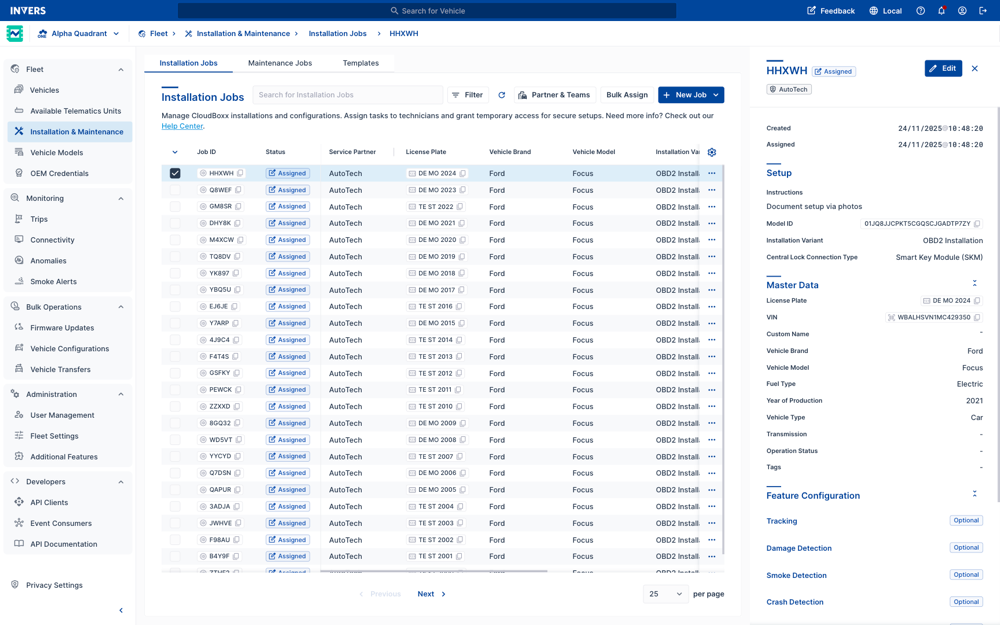
Create Installation Jobs⚓︎
Jobs involve installing or reconfiguring CloudBoxxes in vehicles. Installation Jobs lets you pre-configure CloudBoxxes so technicians don’t make configuration decisions on-site — reducing misunderstandings and installation errors.
Choose the creation method that fits your workflow:
Create a Single Job⚓︎
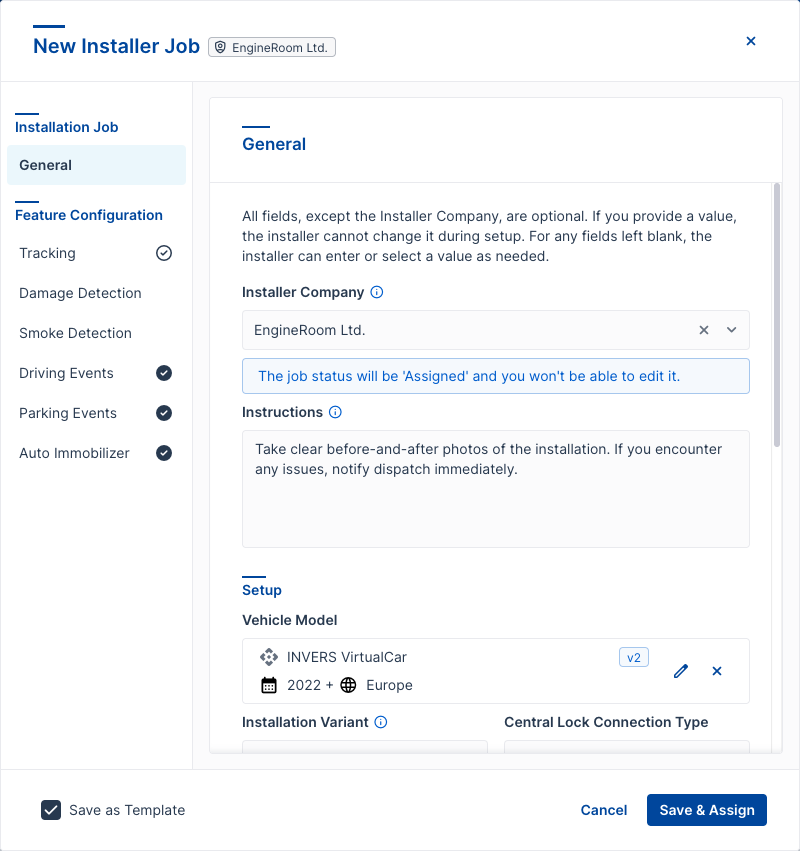
- Go to Fleet → Installation & Maintenance → Installation Jobs.
- Select New Job.
- Choose Create Job or Select from Templates.
- Enter the job details.
- Optional: Select Save as Template if you want to reuse these job settings for future jobs. This saves your current settings as a template, so you can quickly create similar jobs later.
-
Select Save or Save & Assign:
- If you have not selected a service partner, select Save to keep the job as Pending. You can assign it later.
- If you have selected a service partner, select Save & Assign to assign the job immediately.
Create Multiple Jobs at Once⚓︎
Use this method when adding several vehicles of the same type without a spreadsheet. Apply a template for common settings across multiple job drafts quickly.
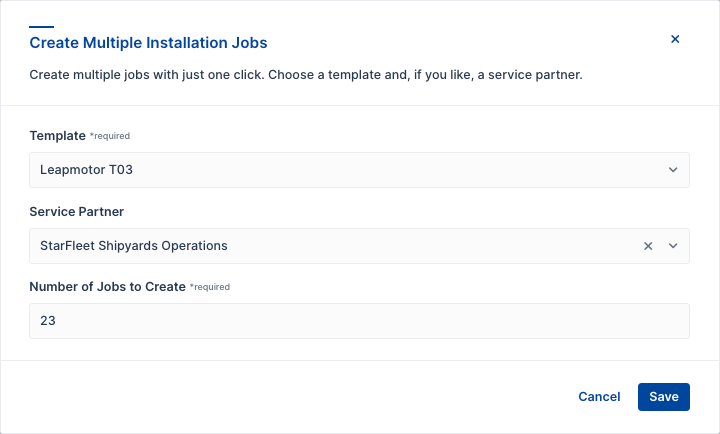
- Go to Fleet → Installation & Maintenance → Installation Jobs.
- Select New Job → Create Multiple Jobs.
- Select a Template from the dropdown (required).
- Optional: Choose a Service Partner to auto-assign all jobs.
- Enter the Number of Jobs to Create.
- Select Save.
All jobs are created with PENDING status (or ASSIGNED if you selected a service partner). Edit individual jobs afterward to add vehicle-specific details like VIN and license plate.
Choose Your Method
Both Create Multiple Jobs and CSV Import support bulk job creation. Choose based on how your data is organized:
- Create Multiple Jobs: Select a template and specify the quantity. Jobs are created as drafts for you to complete with vehicle-specific details.
- CSV Import: Upload vehicle data from a file. Jobs are created with the information from your CSV.
Both methods support any quantity—from a single job to thousands.
Import Jobs from CSV⚓︎
Import 10, 100, or up to 1,000 installation jobs simultaneously from a CSV file—ideal when vehicle data already exists in spreadsheet form or comes from another system.
- Go to Fleet → Installation & Maintenance → Installation Jobs.
- Select New Job → Import.
- Upload your CSV file and review the preview.
- Optional: Select a template to apply standard settings.
- Optional: Assign a service partner (disabled if your CSV already includes
assigned_installer_company_id). - Select Import Installation Jobs.
Your jobs appear in the Installation Jobs table with PENDING or ASSIGNED status, depending on your settings.
CSV Format & Examples
See the complete CSV Import Guide for file format requirements, field descriptions, validation rules, and ready-to-use templates.
Create Maintenance Jobs⚓︎
Manage vehicle maintenance, servicing, and repairs. Assign jobs and provide temporary access for inspections, preventive care, and timely repairs.
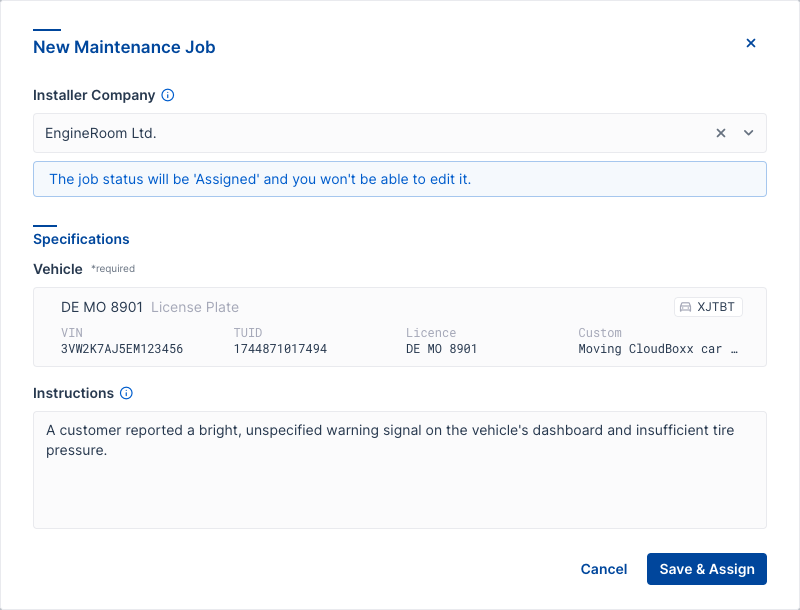
- Go to Fleet → Installation & Maintenance.
- Choose the Maintenance Jobs tab.
- Select New Job.
- Enter the job details.
- Select Save or Save & Assign:
- If you have not selected a service partner, select Save to keep the job as Pending. You can assign it later.
- If you have selected a service partner, select Save & Assign to assign the job immediately.
Create from the Inspect page
You can also create a Maintenance Job directly from a vehicle’s Inspect page. Open More (⋯) in the header and select Create Maintenance Job — the vehicle is pre-filled. Useful when you’re already reviewing a specific vehicle.
Monitor Jobs⚓︎
Customize the table view using the Configure Table Columns under the gear icon, or Filter to view only FAILED jobs for example.
Edit, Duplicate, or Delete Jobs⚓︎
Open the dot menu … to the right to edit, duplicate, or delete a single job. To edit or delete in bulk, select more than one item and open the … menu next to New Job.
Job Status⚓︎
Look for these status indicators to monitor your installations:
- PENDING: You can still edit this job.
- ASSIGNED: Technicians can now access this job.
- RUNNING: A technician is working on this job.
- SUCCEEDED: The technician has completed this job successfully.
- FAILED: The technician couldn’t complete this job (includes their explanation).
Note
FleetControl does not send automatic notifications when jobs are completed or fail. Check the Installation Jobs or Maintenance Jobs table regularly to track status.
Security
Access to the vehicle ends automatically upon job completion. No additional security steps required.