Inspecting Vehicles
Use the Inspect page to see everything about a single vehicle—current status, health indicators, and remote control options (like lock/unlock or enable/disable driving)—all in one place.
Quick Start⚓︎
- Find a vehicle → Use the Global Search or select a Vehicle → Inspect Vehicle at the far right.
- Check Health → Life Status, Signal Quality, Last Contact (use the date picker to review recent days).
- Run Commands → Lock/Unlock, Enable/Disable Driving, or CloudBoxx actions.
- Open Events → Jump to the vehicle’s Events page for timelines and exports.
Accessing the Inspect Page⚓︎
- From Vehicles: select a vehicle in the table → Show Inspect.
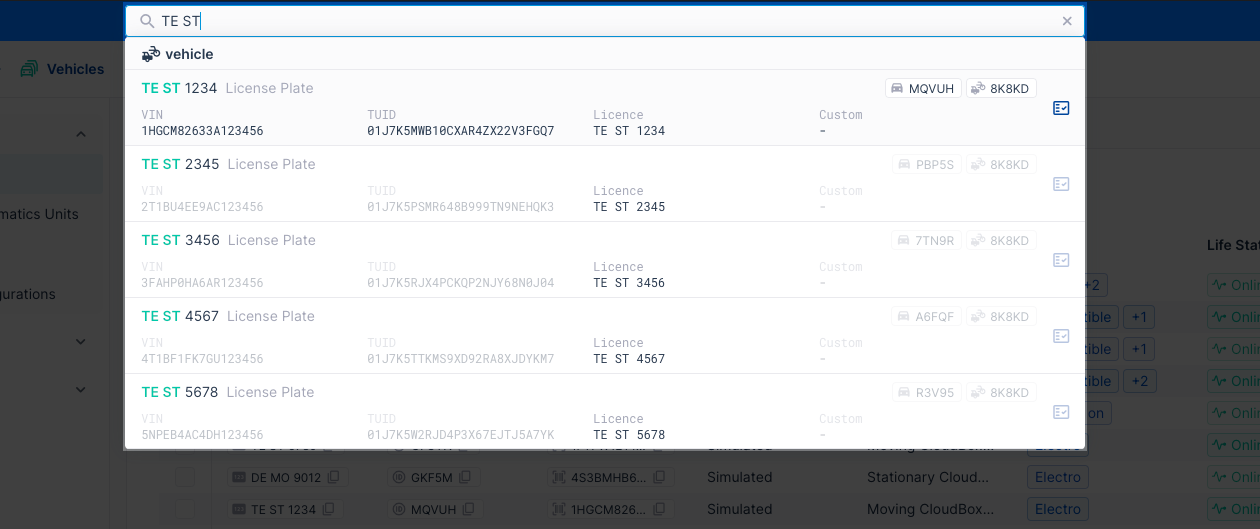
- From Global Search: type brand, model, plate, VIN, or ID → select the vehicle result.
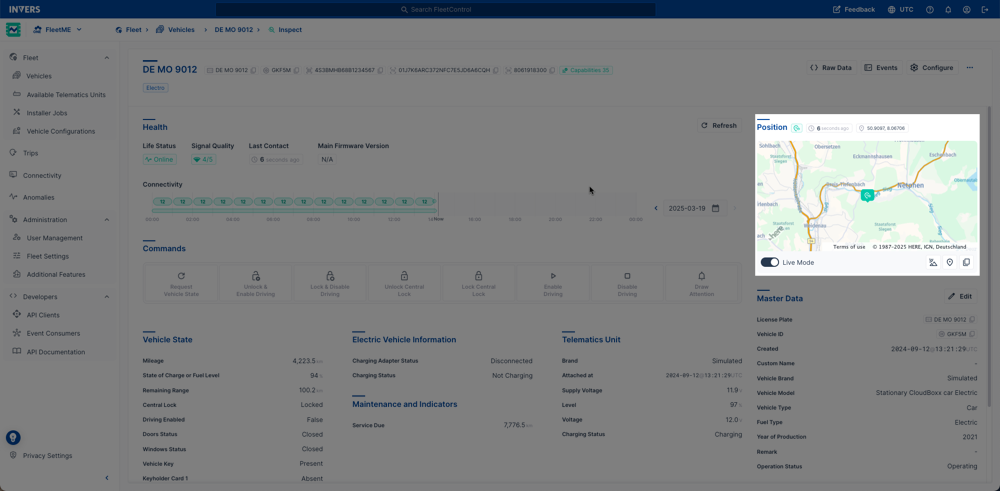
Page Layout⚓︎
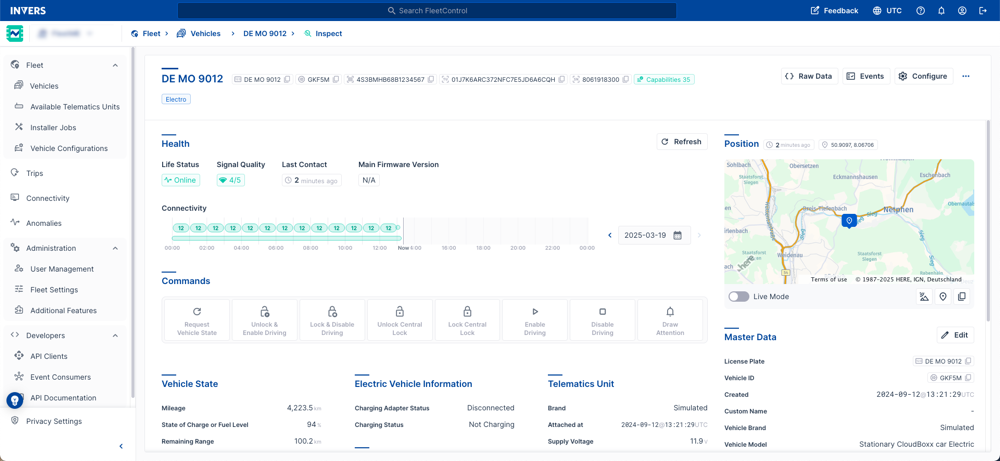
The Inspect page is organized into three main areas that work together to give you complete vehicle visibility:
Header (Top)⚓︎
Key facts appear as tags (plate, VIN, vehicle ID, telematics unit ID, capabilities, and more) alongside action buttons for quick access.
- Copyable Tags — copy values (e.g., VIN) with one click.
- Detailed Tags — e.g., Capabilities opens a dialog showing supported data and commands.
- Custom Tags — add your own labels for grouping and filtering.
Header actions
- Raw Data — view vehicle, vehicle state and CloudBoxx’ system status data in JSON (developer-friendly).
- Events — open the Events page.
- Configure — configure CloudBoxx, accessories, and feature settings (e.g., tracking, damage detection, smoke detection, driving/parking events, auto immobilizer).
- More (⋯) — additional actions:
- Create Maintenance Job
- Bluetooth Tokens
- Share Vehicle
- Change Rental Status (OneAPI fleets)
- Update Firmware (CloudBoxx, Bluetooth module)
- Transfer Vehicle (move to another fleet)
- Archive Vehicle (searchable up to 90 days; then removed)
Automatic Vehicle Removal
Vehicles that remain unused for more than 90 days will be automatically removed from your fleet. The vehicles will be archived first and removed permanently after another 90 days.

Main Content (Center)⚓︎

Health⚓︎
Check Life Status, Signal Quality, Last Contact, and a Connectivity bar at a glance.
Use the date picker to scroll through recent days and spot connectivity patterns.

Commands⚓︎
Run remote commands to control your vehicle. Available commands depend on the vehicle model and what the telematics unit supports (visible in Capabilities).
Requirement: Permission
Using remote commands requires the Vehicle Commands permission.
If you think you should be able to use remote commands, please adjust your own permissions under User Management or reach out to your company’s FleetControl admin.
Generic Command Capabilities
| Command | Description |
|---|---|
| Request Vehicle State | Actively request the current state of the vehicle. |
| Enable Driving Unlock Immobilizer |
Enable driving for the vehicle (usually unlocks the immobilizer). |
| Disable Driving Lock Immobilizer |
Disable driving for the vehicle (usually locks the immobilizer). |
| Unlock Central Lock | Unlock the central lock of the vehicle. |
| Lock Central Lock | Lock the central lock of the vehicle. |
| Unlock & Enable Driving Unlock Immobilizer |
Unlock the central lock and enable driving. |
| Lock & Disable Driving Lock Immobilizer |
Lock the central lock and disable driving. |
| Draw Attention | Draw attention to the vehicle. |
CloudBoxx-Specific Command Capabilities
| Command | Description |
|---|---|
| Switch Mobile Network | Instruct the CloudBoxx to switch to another mobile network. |
| Reset Board | Restart the telematics unit of the vehicle. |
| Reset BLE | Restart the Bluetooth module of the CloudBoxx. |
| Restart Modem | Restart the modem of the CloudBoxx. |
| Reset Data Connection | Restart the data connection of the CloudBoxx. |
| Switch Network | Disconnect the SIM; it reconnects to a different network if available. |
| Request SIM Resumption | Ask the connectivity provider to reactivate a suspended SIM. |
| Request SIM Suspension | Ask the connectivity provider to suspend an active SIM. |
Nervous about clicking commands?
When you select a command (e.g., Enable Driving, Lock Central Lock), a confirmation dialog opens first.
No change is sent to the vehicle until you confirm in the dialog.
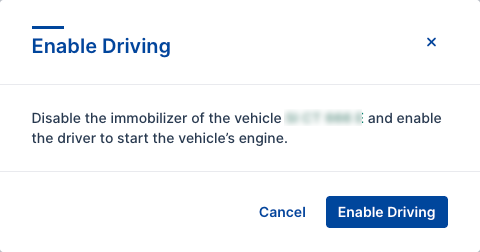
- Select Cancel to close the dialog without sending anything.
- Select the blue Confirm button (e.g., Enable Driving) to send the command.
Exception:
Request Vehicle State runs immediately and does not change anything on the vehicle.
This command simply requests a Vehicle State update (read-only).
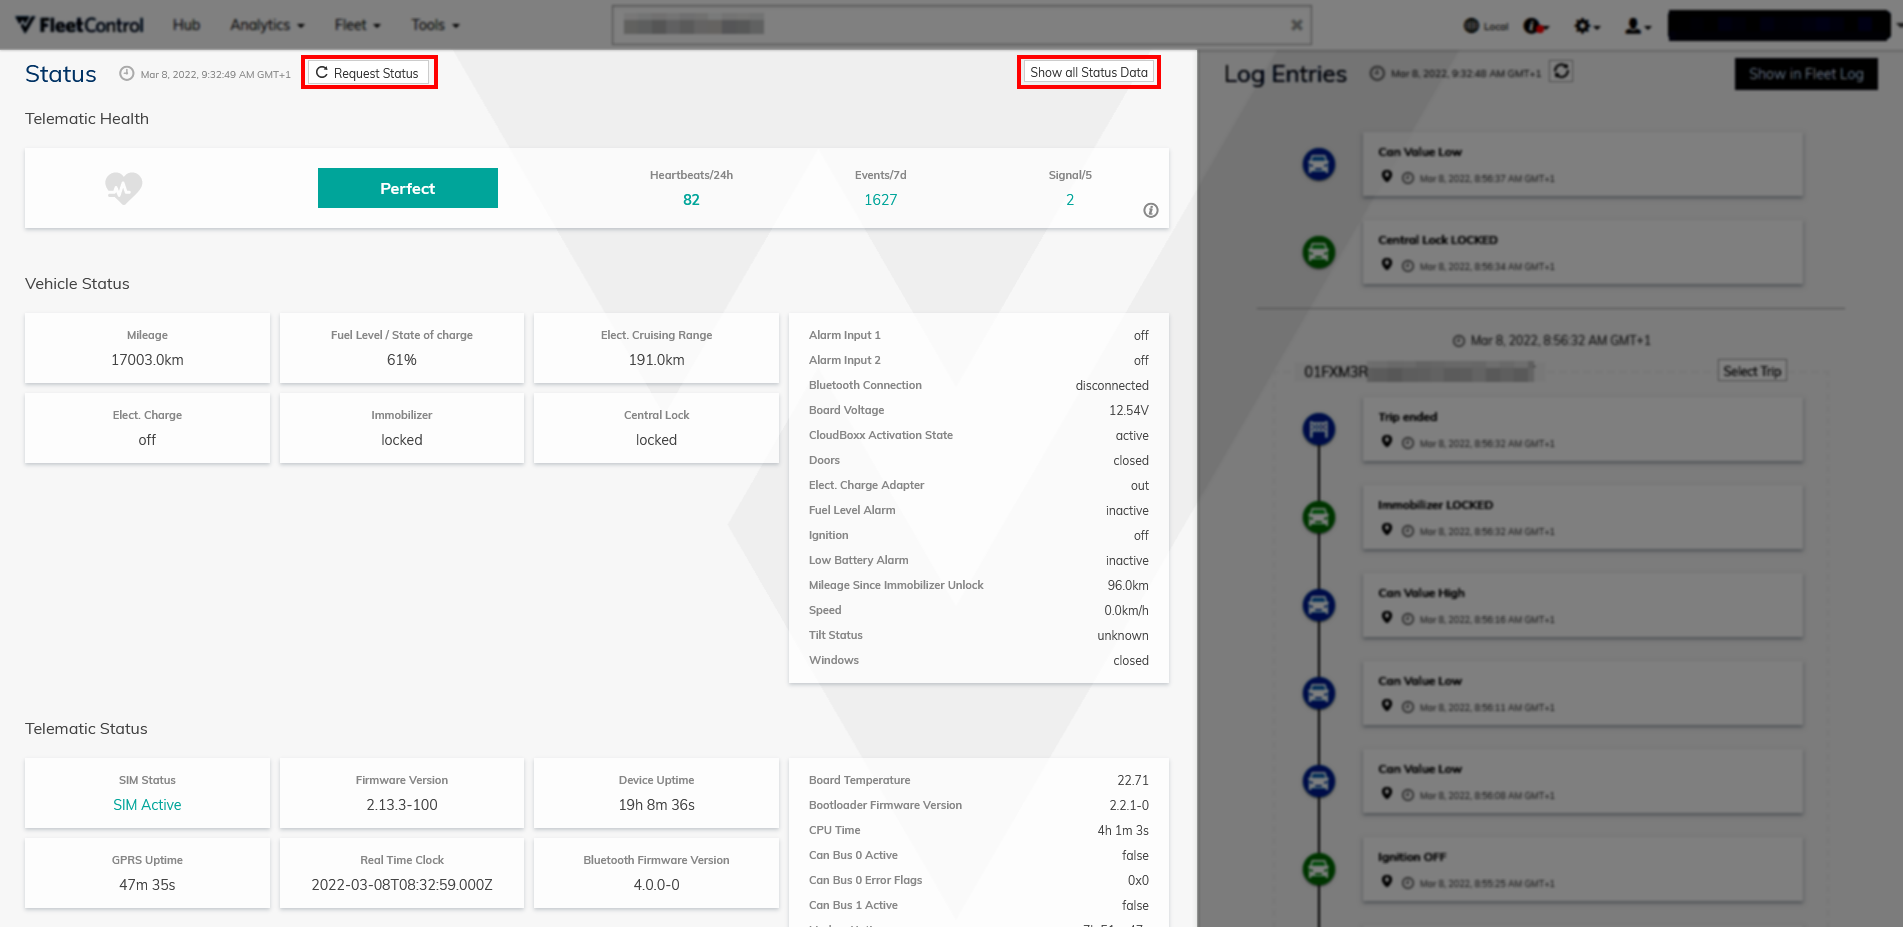
Status Data⚓︎
Status cards display the latest Vehicle States organized into logical groups like Vehicle State, Electric Vehicle Information, Maintenance and Indicators, and Telematics Unit.
The groups and available fields vary depending on your vehicle model and what the telematics unit can report.
See the full list of possible values in Events → Vehicle States.
Central Lock Values
The central lock may briefly show states like Locking and Unlocking while a command is being processed, or Unknown if the current state can’t be determined. Learn more in Central Lock States.
Side Panel (Right)⚓︎
The side panel gives you quick access to positioning tools and master data. It includes a mini-map showing the latest position, Live Mode toggle, position utilities, and master data (which you can edit).
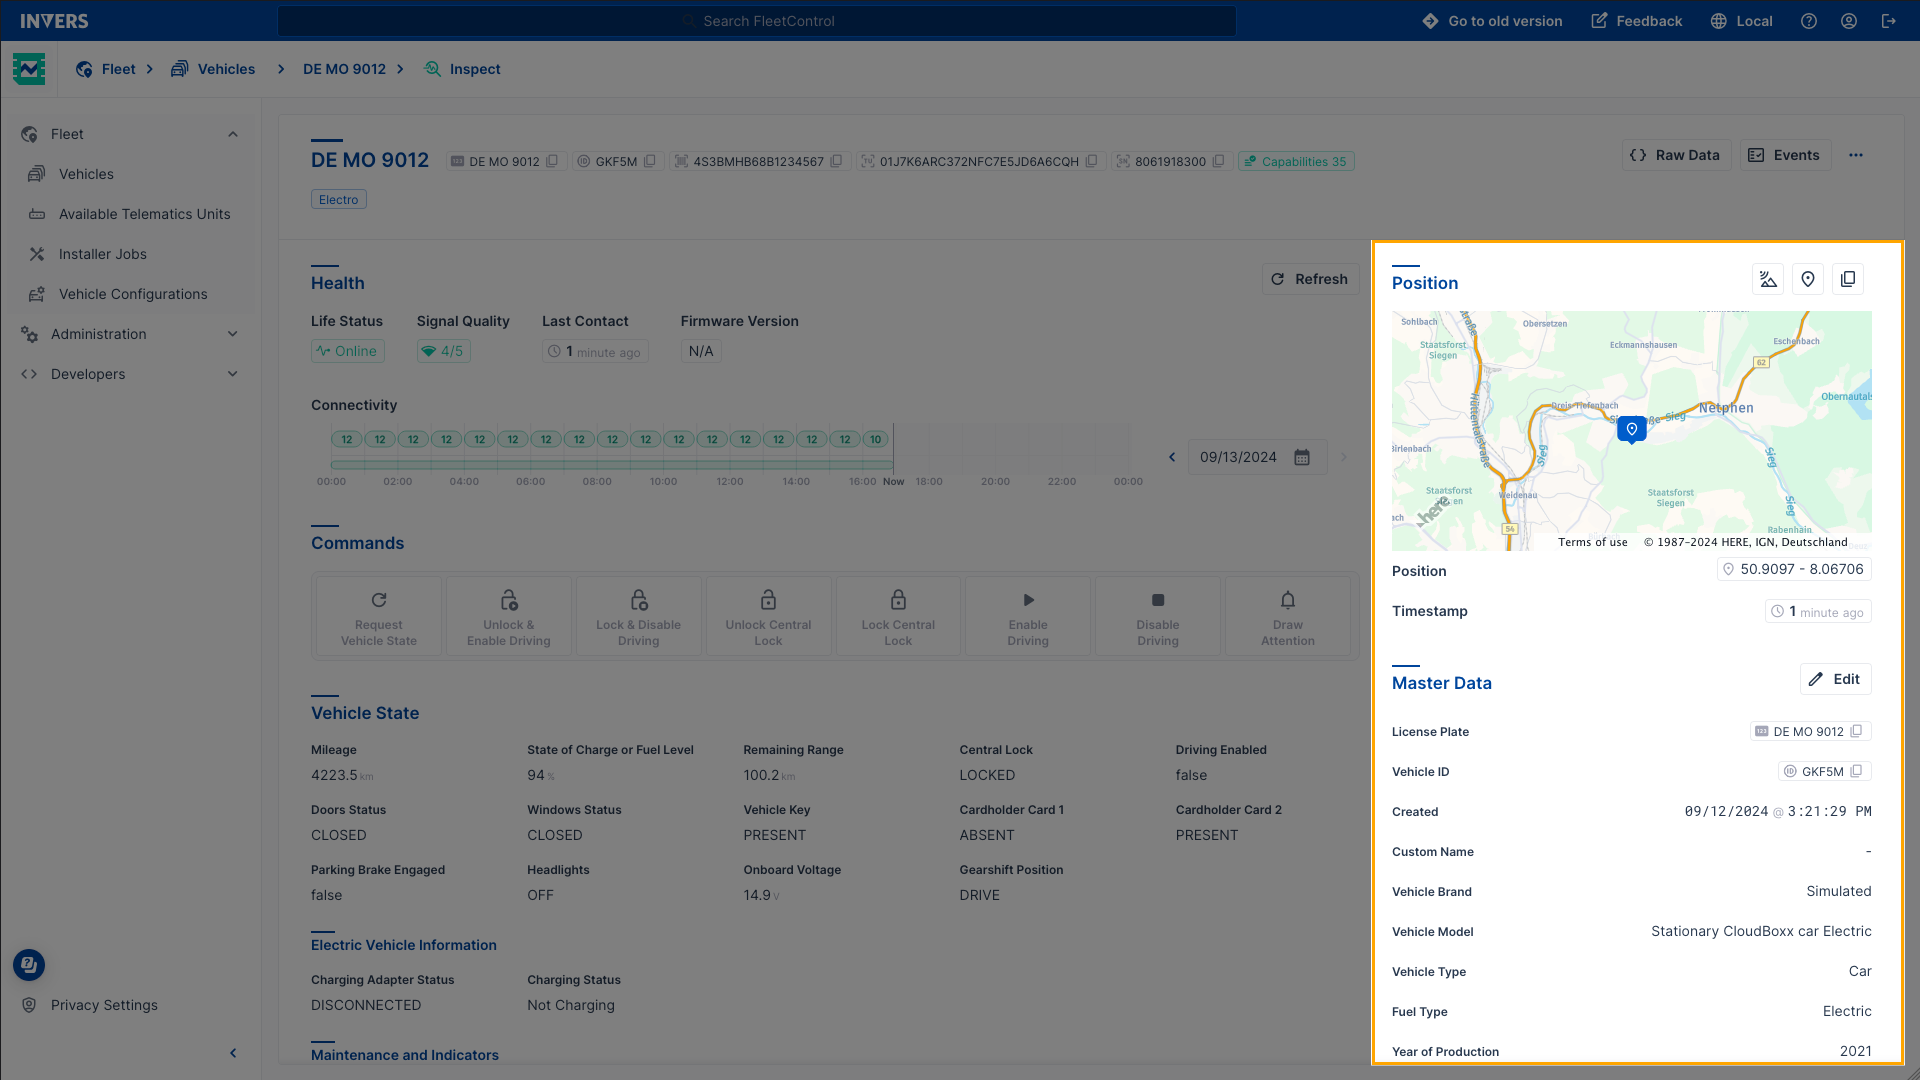
Position tools
- Live Mode: toggle Live Mode for live refresh (incl. position).
- Show GNSS Details: view altitude, heading, speed over ground, etc.
- Locate Vehicle via WiFi: try WiFi positioning when GNSS is weak.
- Open in Google Maps: open the coordinates in Google Maps.
- Copy Coordinates: copy lat/long to the clipboard.
Position Outdated⚓︎
The Position Outdated icon appears when the displayed position is older than expected—meaning the server hasn’t received a position update from the vehicle despite the configured update interval.

Possible causes:
- The vehicle is somewhere a new position can’t be determined (e.g., underground parking).
- The vehicle is offline with no connectivity.
- The GNSS antenna isn’t installed correctly, is damaged, or has become disconnected.
- The positioning module is malfunctioning.
Where you’ll see this:
The icon appears in the vehicle Inspect view and on individual events in Events whenever an event contains an outdated position.
Need to resolve this?
See CloudBoxx Troubleshooting › GPS Position Outdated for diagnostic steps.
Live Mode⚓︎
When you activate Live Mode, the Inspect page refreshes data every 10 seconds for up to 30 minutes (or until you turn it off).
This includes vehicle and telematics metadata, connectivity, vehicle state, and position—all fetched directly from the vehicle.
Remote Service: Activation Required
The Remote Service data protection package is required to request vehicle state data while a vehicle is in rental. Without it, Live Mode can’t fetch vehicle state data during a rental.
Contact INVERS support to enable the Remote Service data protection package for your fleet.
When to Use⚓︎
Use Live Mode when you need real-time data for a specific vehicle—for example, when monitoring suspected unauthorized usage.
Live updates only work if the telematics unit is powered and connected. If the device is disconnected, consider backup trackers or our Fleet Hawk solution.
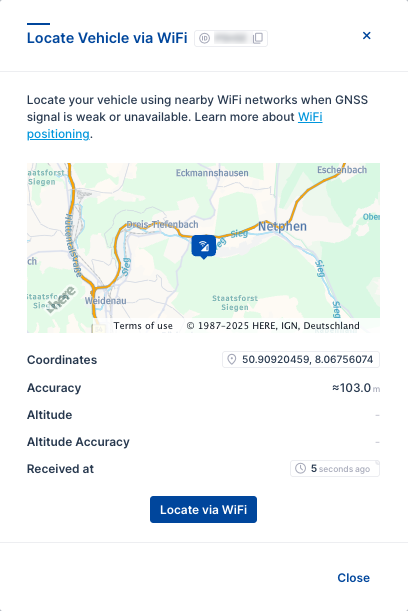
Locate Vehicle via WiFi⚓︎
When GNSS signals are blocked or weak, CloudBoxx can estimate the vehicle’s position using nearby WiFi access points—scanning for networks and calculating location based on signal characteristics from three or more access points.
How It Works⚓︎
WiFi positioning works best in areas with many WiFi networks. The CloudBoxx scans for nearby access points, identifies them, and triangulates an approximate position. Urban environments with dense WiFi coverage give the most reliable results, while rural areas with sparse networks may not work at all.
What to Expect⚓︎
- Processing Time: up to 60 seconds for a fix.
- Accuracy: typically 10-50 meters—significantly lower than GNSS (which usually achieves 5-10 meter accuracy). Best results come from dense urban environments like parking garages, shopping malls, and downtown areas.
- Success Rate: Not guaranteed. If fewer than three access points are detected, positioning may fail.
When to Use WiFi Positioning⚓︎
WiFi positioning helps you locate vehicles when GNSS can’t reach them:
- Underground parking: GNSS signals can’t penetrate concrete and earth.
- Multi-story parking structures: Thick concrete floors block satellite signals.
- Urban canyons: Tall buildings obstruct or reflect GNSS signals.
- Indoor locations: Shopping centers, service facilities, or anywhere the vehicle is fully enclosed.
How to Request WiFi Positioning⚓︎
- Open the Inspect page for your vehicle.
- In the side panel, locate the Position tools section.
- Select Locate Vehicle via WiFi.
- Wait up to 60 seconds for the system to process the request.
- If successful, the map updates with the WiFi-based position estimate.
The system indicates whether the position came from GNSS or WiFi, so you know the expected accuracy level.
Common Tasks⚓︎
Copy VIN or IDs for support tickets
In the Header, use the copy icon on the VIN, vehicle ID, or telematics unit ID.
Unlock and enable driving remotely
Open Commands → run Unlock & Enable Driving / Unlock Immobilizer.
Check connectivity over the last few days
In Health, use the date picker to review recent days; hover over the connectivity bar for details.
Jump to route and events
Select Events in the header to open the vehicle’s Events page (map, timeline, export).